Making a pillow case as a gift, to donate, or for yourself is a wonderful way to bring a personal and unique story into someone's sleeping space. I like to make pillow cases for my close friends and loved ones for holidays and birthdays, or when they are setting out on a journey or moving to a new place. A pillow case is easy to make, it's small and packs flat, and it can be made very special just by the unique variety of materials you choose to combine. What's a better place to rest one's head than on a one-of-a-kind, made-with-love pillow? Or, if you are looking for an easy weekend project and are interested in sewing for a cause, there is the "
1 Million Pillowcase Challenge" hosted by AllPeopleQuilt.com. Here are some pictures of the pillowcases Denise made using their "
Roll-It-Up" pillowcase method:


I recently made a pillowcase for a friend who was moving to the southern Pacific island of Palau. I chose an appropriate variety of appealing cotton prints from Michael Levine's, all with an island air, in a palette of sea greens and azure blues, and featuring tropical foliage, birds, and flowers. It isn't the first time I've made a pillowcase as a "Bon Voyage" gift, because as I mentioned before, a gift for this occasion must be practical and pack flat. He later wrote to me and said "I had to stay in a shady motel the first night, so your pillowcase saved me!"

Before you begin, be sure to choose fabrics that are 45" wide, 100% Cotton. You may also want to pre-wash and dry your materials to prevent uneven shrinkage. I recommend that cotton prints be machine washed in warm water and tumbled dry on warm, and then pressed smooth with an iron on the cotton setting.
1. Cut the fabric using this guide, although you will probably be using different fabrics for each piece:

You will need:
7/8 yard of
main FABRIC A1-1/2" x 45" strip of
piping FABRIC B3/8 yard of
band FABRIC C
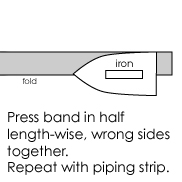
2. Press both band and piping strip in half lengthwise, wrong sides together:

3. Place main fabric (A) right-side-up, design facing you. On the right-hand edge (which will be a 45" edge), layer the piping strip (B) and then the band (C), all raw edges aligned on the right. Stitch together using a 1/2" seam allowance, then serge if you wish. If you would like a no-serge pillowcase method, check out this
video.

4. Open and press band to the right, while pressing piping strip to the left:

5. After pressing, topstitch 1/8" from left edge of band:

6. Fold pillowcase in half, right sides together, wrong sides out, aligning both ends of piping and band. Edges should form squared corners. Starting at top right corner of picture below (band edge / pillowcase opening), stitch and back-stitch, then stitch long edge, pivot at corner , and stitch short edge. Serge if you desire.

7. Iron seams flat, turn pillowcase right side out, and press and steam all seams flat/smooth from outside. You may want to launder once more before using, to soften it up a little.
8. Lastly, if it will be a gift, I like to add a ribbon or bow. Fold or roll up the pillowcase, and tie it with a ribbon or a coordinated strip of silk georgette like I did:

Next time you are looking for a very personal and meaningful gift to give, I hope you will think of this tutorial and give the gift of sweet dreams!

 from
from